Upscaling Images
We’re going to walk through how to take a small, low-resolution image and upscale it to a higher resolution using the upscale endpoint. This is useful for sharpening generated thumbnails, restoring detail in old photos, or producing print-ready assets.
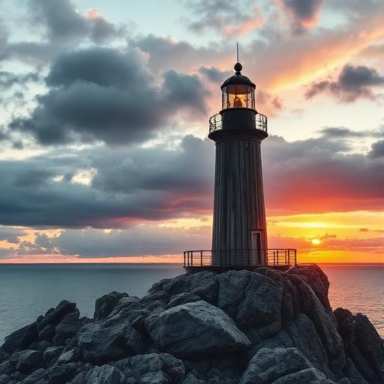
We’ll be using a 384x384 lighthouse photo as our input image:
Project Setup
Section titled “Project Setup”# Create a project directory.mkdir prodia-upscaling-imagescd prodia-upscaling-imagesInstall Node (if not already installed):
brew install node# Close the current terminal and open a new one so that node is available.apt install node# Close the current terminal and open a new one so that node is available.winget install -e --id OpenJS.NodeJS.LTS# Close the current terminal and open a new one so that node is available.Create project skeleton:
# Requires node --version >= 18# Initialize the project with npm.npm init -y
# Install the prodia-js library.npm install prodia --save
Install Python (if not already installed):
brew install python# Close the current terminal and open a new one so that python is available.apt install python3 python3-venv python-is-python3# Close the current terminal and open a new one so that python is available.winget install -e --id Python.Python.3.12# Close the current terminal and open a new one so that python is available.# Requires python --version >= 3.12python -m venv venvsource venv/bin/activatepip install requestsInstall curl (if not already installed):
brew install curl# Close the current terminal and open a new one so that curl is available.apt install curl# Close the current terminal and open a new one so that curl is available.# NOTE: Windows 10 and up have curl installed by default and this can be# skipped.winget install -e --id cURL.cURL# Close the current terminal and open a new one so that curl is available.# Export your token so it can be used by the main code.export PRODIA_TOKEN=your-token-hereYour token is exported to an environment variable. If you close or switch your
shell you’ll need to run export PRODIA_TOKEN=your-token-here again.
Create a main file for your project:
const { createProdia } = require("prodia/v2");
const prodia = createProdia({    token: process.env.PRODIA_TOKEN // get it from environment});
Create the following main.py
from requests.adapters import HTTPAdapter, Retryimport osimport requestsimport sys

prodia_token = os.getenv('PRODIA_TOKEN')prodia_url = 'https://inference.prodia.com/v2/job'
session = requests.Session()retries = Retry(allowed_methods=None, status_forcelist=Retry.RETRY_AFTER_STATUS_CODES)session.mount('http://', HTTPAdapter(max_retries=retries))session.mount('https://', HTTPAdapter(max_retries=retries))session.headers.update({'Authorization': f"Bearer {prodia_token}"})set -euo pipefailYou’re now ready to make some API calls!
Upscale 2x
Section titled “Upscale 2x”The upscale endpoint accepts a single image and returns a larger version of it. The upscale config field controls the factor — 2, 4, or 8.
const { createProdia } = require("prodia/v2");const fs = require("node:fs/promises");
const prodia = createProdia({  token: process.env.PRODIA_TOKEN,});
(async () => {  // get input image  const inputBuffer = await (await fetch("https://docs.prodia.com/upscale-input.jpg")).arrayBuffer();
  const job = await prodia.job({    type: "inference.upscale.v1",    config: {      upscale: 2,    },  }, {    inputs: [ inputBuffer ]  });
const image = await job.arrayBuffer(); await fs.writeFile("upscaled.jpg", new Uint8Array(image));})();node main.jsfrom requests.adapters import HTTPAdapter, Retryfrom io import BytesIOimport jsonimport osimport requestsimport sys
prodia_token = os.getenv('PRODIA_TOKEN')prodia_url = 'https://inference.prodia.com/v2/job'
session = requests.Session()retries = Retry(allowed_methods=None, status_forcelist=Retry.RETRY_AFTER_STATUS_CODES)session.mount('http://', HTTPAdapter(max_retries=retries))session.mount('https://', HTTPAdapter(max_retries=retries))session.headers.update({'Authorization': f"Bearer {prodia_token}"})
try: with open('upscale-input.jpg', 'rb') as f: input_image = f.read()except FileNotFoundError: res = requests.get('https://docs.prodia.com/upscale-input.jpg') input_image = res.content with open('upscale-input.jpg', 'wb') as f: f.write(res.content)
headers = { 'Accept': 'image/jpeg',}
job = { 'type': 'inference.upscale.v1', 'config': { 'upscale': 2, },}
files = [ ('job', ('job.json', BytesIO(json.dumps(job).encode('utf-8')), 'application/json')), ('input', ('upscale-input.jpg', input_image, 'image/jpeg')),]
res = session.post(prodia_url, headers=headers, files=files)print(f"Request ID: {res.headers['x-request-id']}")print(f"Status: {res.status_code}")
if res.status_code != 200: print(res.text) sys.exit(1)
with open('upscaled.jpg', 'wb') as f: f.write(res.content)python main.pyset -euo pipefail
cat <<EOF > job.json{ "type": "inference.upscale.v1", "config": { "upscale": 2 }}EOF
if [[ ! -f upscale-input.jpg ]]; then curl -Lo upscale-input.jpg 'https://docs.prodia.com/upscale-input.jpg'fi
curl -sSf --retry 3 \ -H "Authorization: Bearer $PRODIA_TOKEN" \ -H 'Accept: image/jpeg' \ --output upscaled.jpg \ https://inference.prodia.com/v2/jobbash main.shopen upscaled.jpgxdg-open upscaled.jpgstart upscaled.jpgThe 384x384 input is now a sharp 768x768 image. Edges around the lighthouse and rocks have crisper detail and the JPEG compression artifacts in the sky are gone:

Upscale 4x
Section titled “Upscale 4x”For larger outputs, set upscale to 4 or 8. The endpoint returns the same dimensions multiplied by the chosen factor — for our 384x384 input, upscale: 4 produces a 1536x1536 image.
const { createProdia } = require("prodia/v2");const fs = require("node:fs/promises");
const prodia = createProdia({  token: process.env.PRODIA_TOKEN,});
(async () => {  // get input image  const inputBuffer = await (await fetch("https://docs.prodia.com/upscale-input.jpg")).arrayBuffer();
  const job = await prodia.job({    type: "inference.upscale.v1",    config: {      upscale: 4,    },  }, {    inputs: [ inputBuffer ]  });
const image = await job.arrayBuffer(); await fs.writeFile("upscaled-4x.jpg", new Uint8Array(image));})();node main.jsfrom requests.adapters import HTTPAdapter, Retryfrom io import BytesIOimport jsonimport osimport requestsimport sys
prodia_token = os.getenv('PRODIA_TOKEN')prodia_url = 'https://inference.prodia.com/v2/job'
session = requests.Session()retries = Retry(allowed_methods=None, status_forcelist=Retry.RETRY_AFTER_STATUS_CODES)session.mount('http://', HTTPAdapter(max_retries=retries))session.mount('https://', HTTPAdapter(max_retries=retries))session.headers.update({'Authorization': f"Bearer {prodia_token}"})
try: with open('upscale-input.jpg', 'rb') as f: input_image = f.read()except FileNotFoundError: res = requests.get('https://docs.prodia.com/upscale-input.jpg') input_image = res.content with open('upscale-input.jpg', 'wb') as f: f.write(res.content)
headers = { 'Accept': 'image/jpeg',}
job = { 'type': 'inference.upscale.v1', 'config': { 'upscale': 4, },}
files = [ ('job', ('job.json', BytesIO(json.dumps(job).encode('utf-8')), 'application/json')), ('input', ('upscale-input.jpg', input_image, 'image/jpeg')),]
res = session.post(prodia_url, headers=headers, files=files)print(f"Request ID: {res.headers['x-request-id']}")print(f"Status: {res.status_code}")
if res.status_code != 200: print(res.text) sys.exit(1)
with open('upscaled-4x.jpg', 'wb') as f: f.write(res.content)python main.pyset -euo pipefail
cat <<EOF > job.json{ "type": "inference.upscale.v1", "config": { "upscale": 4 }}EOF
if [[ ! -f upscale-input.jpg ]]; then curl -Lo upscale-input.jpg 'https://docs.prodia.com/upscale-input.jpg'fi
curl -sSf --retry 3 \ -H "Authorization: Bearer $PRODIA_TOKEN" \ -H 'Accept: image/jpeg' \ --output upscaled-4x.jpg \ https://inference.prodia.com/v2/jobbash main.shopen upscaled-4x.jpgxdg-open upscaled-4x.jpgstart upscaled-4x.jpgAt 4x, the rocks gain individual texture and the clouds resolve into distinct shapes:

Parameters
Section titled “Parameters”| Parameter | Type | Values | Default | Description |
|---|---|---|---|---|
upscale | number | 2, 4, 8 | 2 | How many times larger the output should be along each dimension. |
Picking a factor
Section titled “Picking a factor”| Goal | Factor |
|---|---|
| Sharpen a generated image without changing dimensions much | 2 |
| Produce a print-ready or hero-banner asset from a thumbnail | 4 |
| Maximum resolution for archival or large-format display | 8 |
Outputs scale quadratically — an 8x upscale of a 1024x1024 input produces an 8192x8192 image (around 67 megapixels), so prefer the smallest factor that meets your needs.